Introduction
Optimum levels of carbon dioxide from carbon dioxide injection allow aquatic plants to grow 7 to 10 times faster than in non-injected aquariums. In an aquarium without CO2 injection, the average CO2 level is 1-3 parts per million (ppm). For an aquarium with CO2 injection, you would start to see benefits at lower levels of CO2 saturation: 10 to 15ppm will grow most common aquarium carpets and most basic plants, while pickier species and more demanding tanks will see benefits at 30+ppm CO2. However, lower saturation levels are subject to greater variability and some more difficult plant species have higher success rates at higher CO2 saturations. The increase in growth and plant vigour will also make the plants more resistant to algae.
30ppm of CO2 is well tolerated by the majority of livestock as long as there is sufficient gas exchange across the water surface to remove excess CO2 build-up. To read more about why gas exchange is important in CO2 injected tanks, click here.
The red Eriocaulon quinguangular and 'Blood vomit' are examples of species that prefer high CO2 levels. They require high CO2 saturation rates (35ppm+) to grow well in the long term and to reproduce successfully.
The difficulty with measuring CO2 levels in an aquarium is that the current methods available to hobbyists to test CO2 levels are either cumbersome to implement or simple but inaccurate.
1. Accurate but expensive
The aquatic fish farming industry and laboratory hardware industry has instruments that can measure dissolved CO2 levels very accurately, however, they come at significant cost.
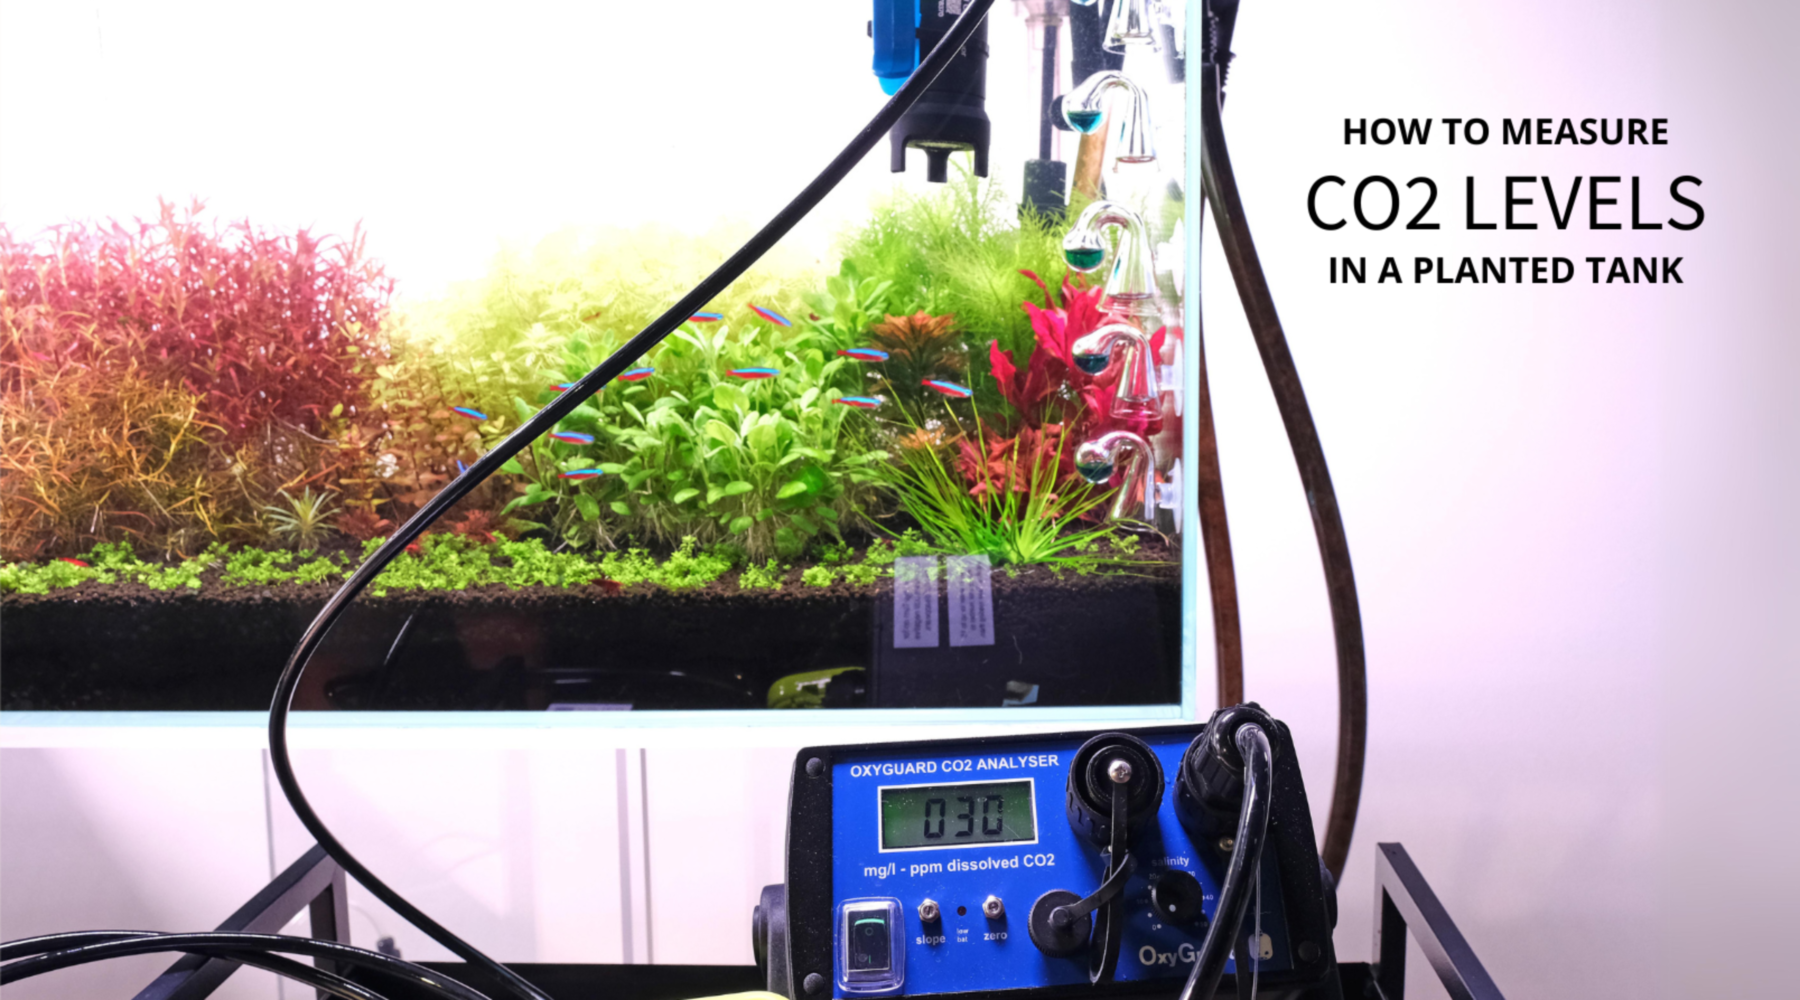
At 2hr Aquarist we use an OxyGuard CO2 analyzer to measure CO2 levels. It measures free dissolved CO2 directly and is unaffected by carbonates or other dissolved substances through the use of a special membrane probe (accuracy of 1ppm). We use this instrument to calibrate the other methods described on this page.
This option is open to enthusiasts who want to go the extra mile, but costs more than the entirety of most high-tech tank setups.

The OxyGuard CO2 analyser provides highly accurate readings of free dissolved CO2. The probe measures the carbon dioxide content of the water directly by detecting the carbon dioxide partial pressure in the water - its readings are independent of pH measurement.
2. Easy but inaccurate: Drop-checkers
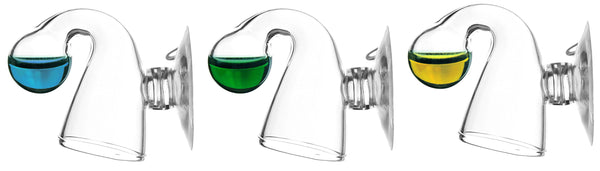
The device, called a 'drop checker', contains a solution calibrated to 4 dKH coupled to a dye that changes colour depending on the pH of the solution. The device is attached to the side of the aquarium, with air isolating the solution from the surrounding aquarium water. Ideally, CO2 will diffuse out of the aquarium water and come into equilibrium with the dye solution, changing its pH and the colour of the dye. The Drop Checker solution will start to turn blue, indicating a low level of CO2 dissolved in the aquarium water. As CO2 saturates the tank water and diffuses into the dye solution, it gradually turns green, indicating an 'optimum' level of CO2. As more CO2 is injected into the tank, the drop checker will turn yellow, indicating that the CO2 level is "too high".
Many hobbyists like to use drop checkers, but they are not a reliable method of determining CO2 levels, largely due to problems with colour interpretation.
Problems with color interpretation and range of error
 4dKH solution with their theoretical values of CO2 saturation using method by ( Millero, 2002).
True 4 dKH solutions in drop checkers using bromothymol blue as an indicator turn green at 10.7ppm CO2, which is far from the advertised 30ppm claimed by commercial sites. Each 0.1pH change downwards is approximately an additional 26% CO2 over the previous pH. There is a huge difference in CO2 levels depending on whether you hit the 'green' colour at pH 6.7 or the 'green' colour at pH 7.0, with the former having twice the CO2 levels of the latter. While the Drop Checker solution turns green at 10+ppm, this low level of CO2 saturation is not optimal for most tanks. Using it to target higher levels, say 30 or 40ppm CO2, is difficult due to the near yellow tones associated with these levels.

What is the exact colour of the Drop Checkers on this tank? As CO2 diffuses into the Drop Checker, the top layer of Drop Checker liquid reacts first and it takes a long time for the entire Drop Checker solution to become uniformly coloured. While colour charts look easy to read on a computer screen, it is difficult to determine the exact colour shade in real life.

Time delay: Drop checkers were added to this tank with a CO2 saturation of 30ppm. It took over 90 minutes for the Drop Checkers to fully change to a stable (yellow) colour. If the CO2 level is too high, the animals are likely to show signs before the Drop Checkers do. The Drop Checkers also react very slowly to drops in CO2 levels during the window when CO2 is switched on.
Many guides position the Drop Checker close to the surface of the tank, which is the worst possible position for a Drop Checker as it will give a false positive by capturing CO2 bubbles that would normally escape to the surface water of the tank.
If used at all, drop checkers should be placed near the middle or bottom of the aquarium. They can give a rough indication that some minimal level of CO2 is present if the colouration is at least green (indicating that there is at least 10+ppm of CO2). However, it is difficult to aim for a higher, precise number such as 30ppm. For many aquarists with low demand tanks, some indicator may be better than none. It can also be useful as a relative indicator for people with good colour vision - if the tank is running well at a particular colour, aquarists can use it as a daily visual checkpoint to see if the same colour tone is being maintained.
3. Testing for the change in pH as CO2 is injected
As gaseous CO2 dissolves in water, a small proportion of it is converted to carbonic acid, reducing the acidity of the water (causing the pH to drop). CO2 levels can therefore be measured by comparing the pH of the tank water before injection begins and during CO2 injection, during which time the pH will fall steadily as the CO2 levels in the water build up until it reaches equilibrium - when your CO2 injection rate equals the rate of CO2 outgassing.
The relationship between pH and CO2 is logarithmic, so a pH shift of 1.0 down means that CO2 levels have increased 10 times from the initial value. I.e. if your starting pH is 7.0 and the pH drops to 6.0 with the only change being the addition of CO2 to the water, the water at pH 6.0 will have 10x the amount of CO2 compared to the starting sample at pH 7.0. This relationship holds regardless of the base KH. Using arithmetic, a 0.1 pH shift downwards represents approximately a 26% increase in CO2 from the previous reading. This means that if your initial pH is 7.0 and the pH drops to 6.9 due to the addition of CO2, the 6.9 pH water will contain approximately 26% more CO2 than the 7.0 pH water.

What is the base level of CO2 in standing water?
The base level of CO2 in standing water is just 0.6ppm given the amount of CO2 in the atmosphere and Henry's law. However, most non CO2-injected planted aquaria measure higher levels than those due to respiration (fish, plants, microbes) and other environmental variables - non CO2-injected aquaria average around 2-3ppm CO2. This level is used as the baseline level of CO2 in most CO2 pH drop tests. A 1pH drop from the baseline level will therefore result in levels between 20-30ppm CO2.
CO2-pH-KH chart
Enthusiasts with access to accurate measuring equipment have constructed the CO2-pH/KH table as a guide, but the table is often misused by hobbyists.

Problems with the pH/KH/CO2 table
The table is based on the assumption that the only factors affecting pH are CO2 and alkalinity. In reality, however, most tanks contain a wide variety of other substances that affect pH in addition to the basic KH. These include humic acids from buffering substrates such as aquasoil/peat or organic acids from organic matter. Additives such as liquid fertiliser will also alter the pH. Therefore, in most planted tanks, the table will not give an accurate reading most of the time. Worse still, hobbyists have no way of knowing whether the chart will work for their tank or not because they have no way of taking into account the various factors that can affect the pH in their tank.
Many hobbyists measure the KH and pH of their aquarium, compare the values on the chart and conclude that the number indicates the level of CO2 in their aquarium. This leads to some absurd conclusions, such as non CO2-injected tanks having extremely high levels of CO2, or in the case of CO2-injected tanks, having 100+ ppm of CO2 due to a low pH reading. All of these false readings occur because the pH of the tank naturally drops due to non-CO2 factors.
So while the table is useful as a reference of how the pH/KH relationship works. In reality, no hobbyist will have enough accurate chemistry data on what is in their water column to use it in any meaningful way. In almost every scenario where the table is used, it is used as a source of confirmation bias in the incident scenario where the hobbyist's readings happen to match the values on the table.
Using the pH drop method
The pH drop method is reasonably reliable when tested against CO2 analyser readings. It gives much more reliable results than the drop checker method or the incorrect hobbyist extrapolations using the CO2-pH-KH chart.
You need two values - the pH before CO2 injection and the pH when the CO2 has reached saturation point. Reaching this point can take from 1 to over 4 hours of CO2 injection, depending on the injection rate and gas exchange mechanism of the individual tank.
You can also do the reverse by comparing the pH reading in the tank when the CO2 is saturated, then taking a sample and degassing the CO2 by stirring/shaking the sample in the air. This is the method we recommend people use.
Complications with the pH drop method
The difficulty with the pH drop method is obtaining a properly degassed sample of tank water.
Many tanks do not completely purge CO2 during the window when CO2 is switched off. This means that even after CO2 has been turned off, tanks will generally still have elevated levels of CO2 (typically 5-8ppm) for many hours, often into the next day. To obtain an off-gassed sample, we recommend taking a sample of tank water and stirring/shaking the mixture for a few minutes.
Some people try to do the 1pH drop method by simply comparing the pH when the CO2 is turned off for many hours to the pH when the CO2 is turned on and left to saturate for a few hours. However, as most tanks retain quite a lot of CO2 in the water for long periods of time, this can give very distorted readings. For example, if the tank is holding only 5ppm of CO2 (2ppm above the average baseline), a 1pH drop means that the tank is holding 50ppm of CO2. Remember from the above calculations that a 1pH drop requires 10 times the amount of CO2 compared to the baseline reading. People will find that their fish start gasping for air at the surface even though they haven't achieved the full 1 pH drop when they use an elevated baseline value.

Leaving a glass of water on the table for 24 hours, does it fully degas fully to give a usable baseline reading? Now always. In the above example, tank water was left on the table for 25 hours, and it still measured 5ppm of CO2.
Degassing a sample of CO2 and see the pH rise

Instead of waiting for the pH to drop as a result of CO2 injection, we can also compare the rise in pH when we degas a sample of water. In the laboratory we use a magnetic stirrer to degas a sample of tank water. The equivalent action that a hobbyist can do is to take a sample of water from the tank and stirring/shaking it for a few minutes while allowing the sample to air out. Even with vigorous stirring/shaking, most of the degassed samples we measure still have a residual CO2 level of around 2-3ppm. This is the average result that hobbyists can base their calculations on.
A generally good range to aim for is a pH change of 1 full point. For example, if your tank has a pH of 5.5, after degassing you would expect the pH to increase by 1 full point to 6.5. From a degassed level of 3ppm CO2 this would give you around 30+ppm CO2.
Aim for a 1 point pH drop difference between a degassed sample and CO2 injection at saturation point and you will be in a good zone.
For people targeting a higher range of CO2 - 40ppm and above - a 1.2 to 1.4 pH drop can be targeted. While this method has some room for error, in practical tests against readings taken by the CO2 analyser, a 1pH drop using the degassing method described above puts it very close to the 30ppm of CO2 measured.
A truly degassed sample - stirred for a long time (hours) in a well ventilated place, or perhaps by boiling the sample - will reach the true base level of dissolved CO2 according to atmospheric readings and Henry's Law - 0.6ppm CO2. At this level, the pH must fall by 1.7 points to match a corresponding increase in CO2 from 0.6ppm to 30ppm. Most tanks will not match the theoretical calculations due to a number of confounding variables.
For CO2 aficionados, you can read more on the problems of measuring CO2 in papers such as Millero 2002.
4. Gauging CO2 levels by using a CO2 test kit

Of the CO2 test kits we tested, the Hanna CO2 test kit HI3818 gives very accurate readings compared to the Oxyguard CO2 analyser (+-5ppm). The Hanna CO2 kit is only 40+ USD, which makes it very affordable for what it does. The main drawback is that the kit requires titration and some minor maths.
At the moment we are still testing it to see if other pH buffers in the water column significantly affect its readings.
5. Gauging CO2 levels by observing plant growth form
For planted tanks we should generally aim to inject as much CO2 as the most CO2 sensitive plant we are currently growing requires. Plant growth form is very variable for species that require high CO2 levels to grow well. Therefore, observing plant growth form is actually the most accurate feedback we have on whether or not our tank is getting enough CO2. The obvious drawback to this method is that interpreting plant growth form requires experience that newer aquarists will not have. Also, most people will not be able to tell whether growth changes are due to CO2 or something else.
However, being able to read some common plants is a useful skill.
One common plant that is a good test for CO2 levels is HC (dwarf baby tears). It is an undemanding plant as long as it has access to high CO2 levels - this allows us to easily isolate changes in CO2 levels as the main cause of its growth rate shape. There are comparisons of HC grown at different CO2 levels on the plant page. Other fussy plants that need good CO2 levels to grow are Blood Vomit and the red Eriocaulon quinquangular.
CO2 affects the general health/growth rate and vigour of aquatic plants as it makes up about 50% of the plant's dry mass.
A lack of it manifests in many ways:
-
Thin stem, leaves, though adequate fertilization/light is given.
-
Bare lower stems, old leaves fading quickly, only leaving healthy top leaves; this is often coupled with algae issues.
-
Vertical growth in carpeting plants, rather than horizontal creeping.
-
Excessive stem elongation combined with bare lower leaves; often a sign of both poor CO2 & poor O2 together.
-
New growth curled & stunted.
-
Progressively smaller & smaller new leaves- this is one of the strongest signs of CO2 deficiency.

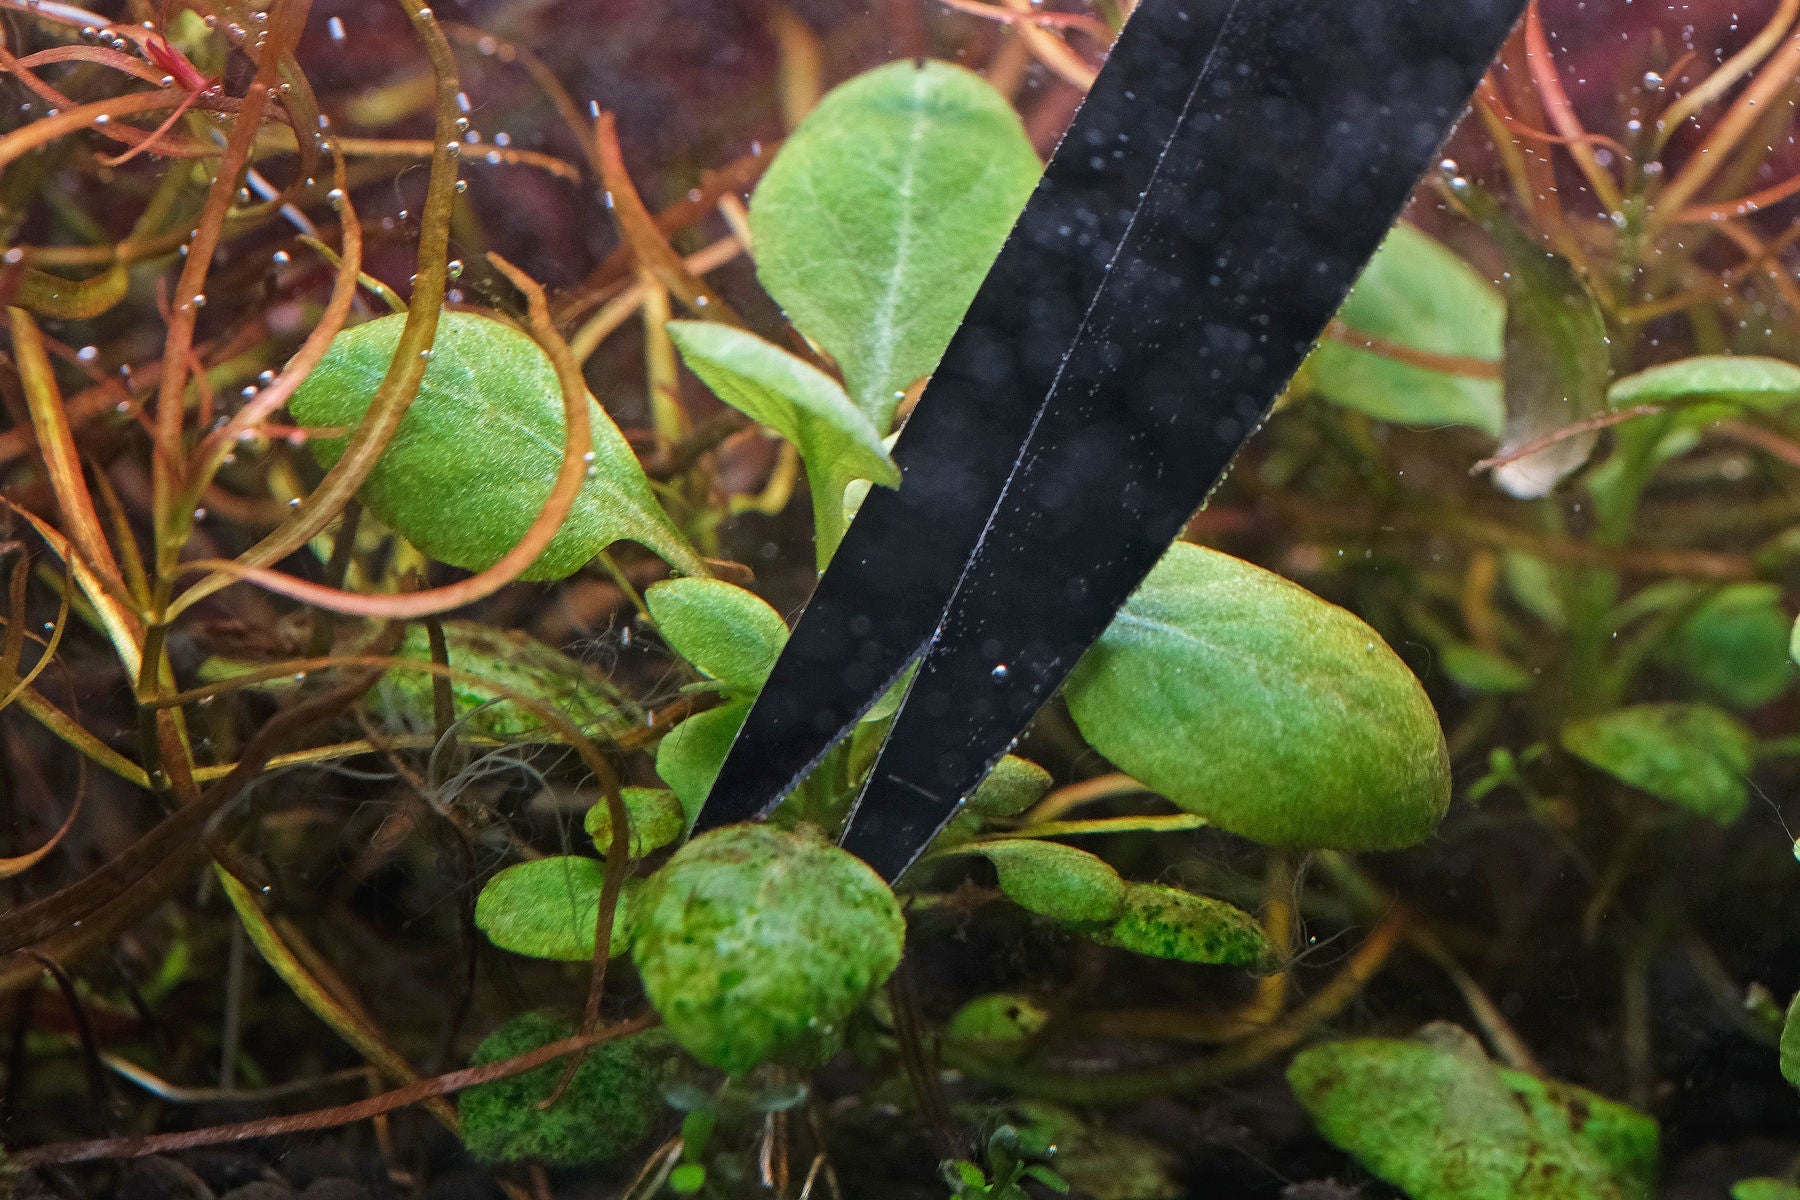
HC is one of the best indicator plants for CO2 levels. At sub-optimal levels the plant grows spindly and vertically with small leaves. At good CO2 levels it will have a strong creeping form with good sized leaves.

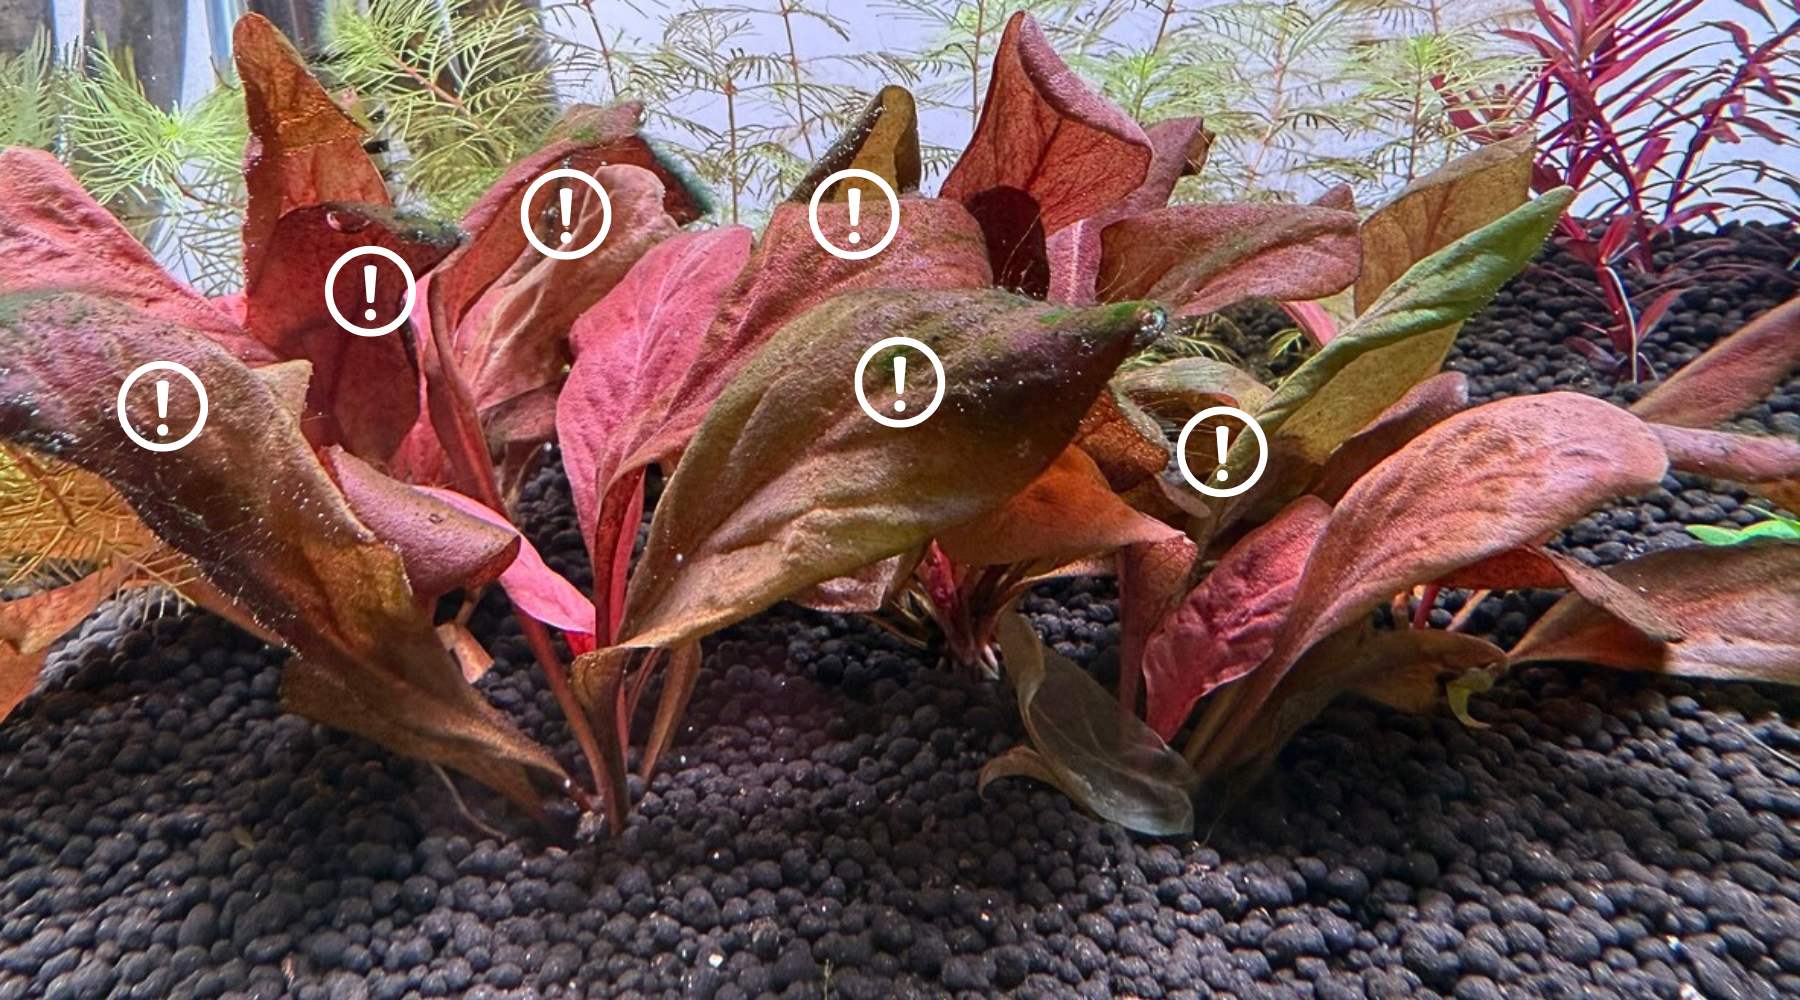
Pic on the left shows several signs of classic CO2 issues in Rotala rotundifolia.
Elongated internodes, uneven growth pattern and progressively smaller leaves in new growth. Elongated internodes often indicate a combination of both CO2/O2 deficiencies, more on this in the Gas Exchange section. The picture on the right shows the same species under better conditions.
Ludwigia sp. Red

Note the thinning of the stem and the progressively smaller leaf forms in the left picture of Ludwigia sp. Red. The overall leaf shape is also smaller.
In the left picture the older growth looks distinctly redder, more fully formed. This suggests that the current conditions are problematic, whereas the plant grew better in the past.

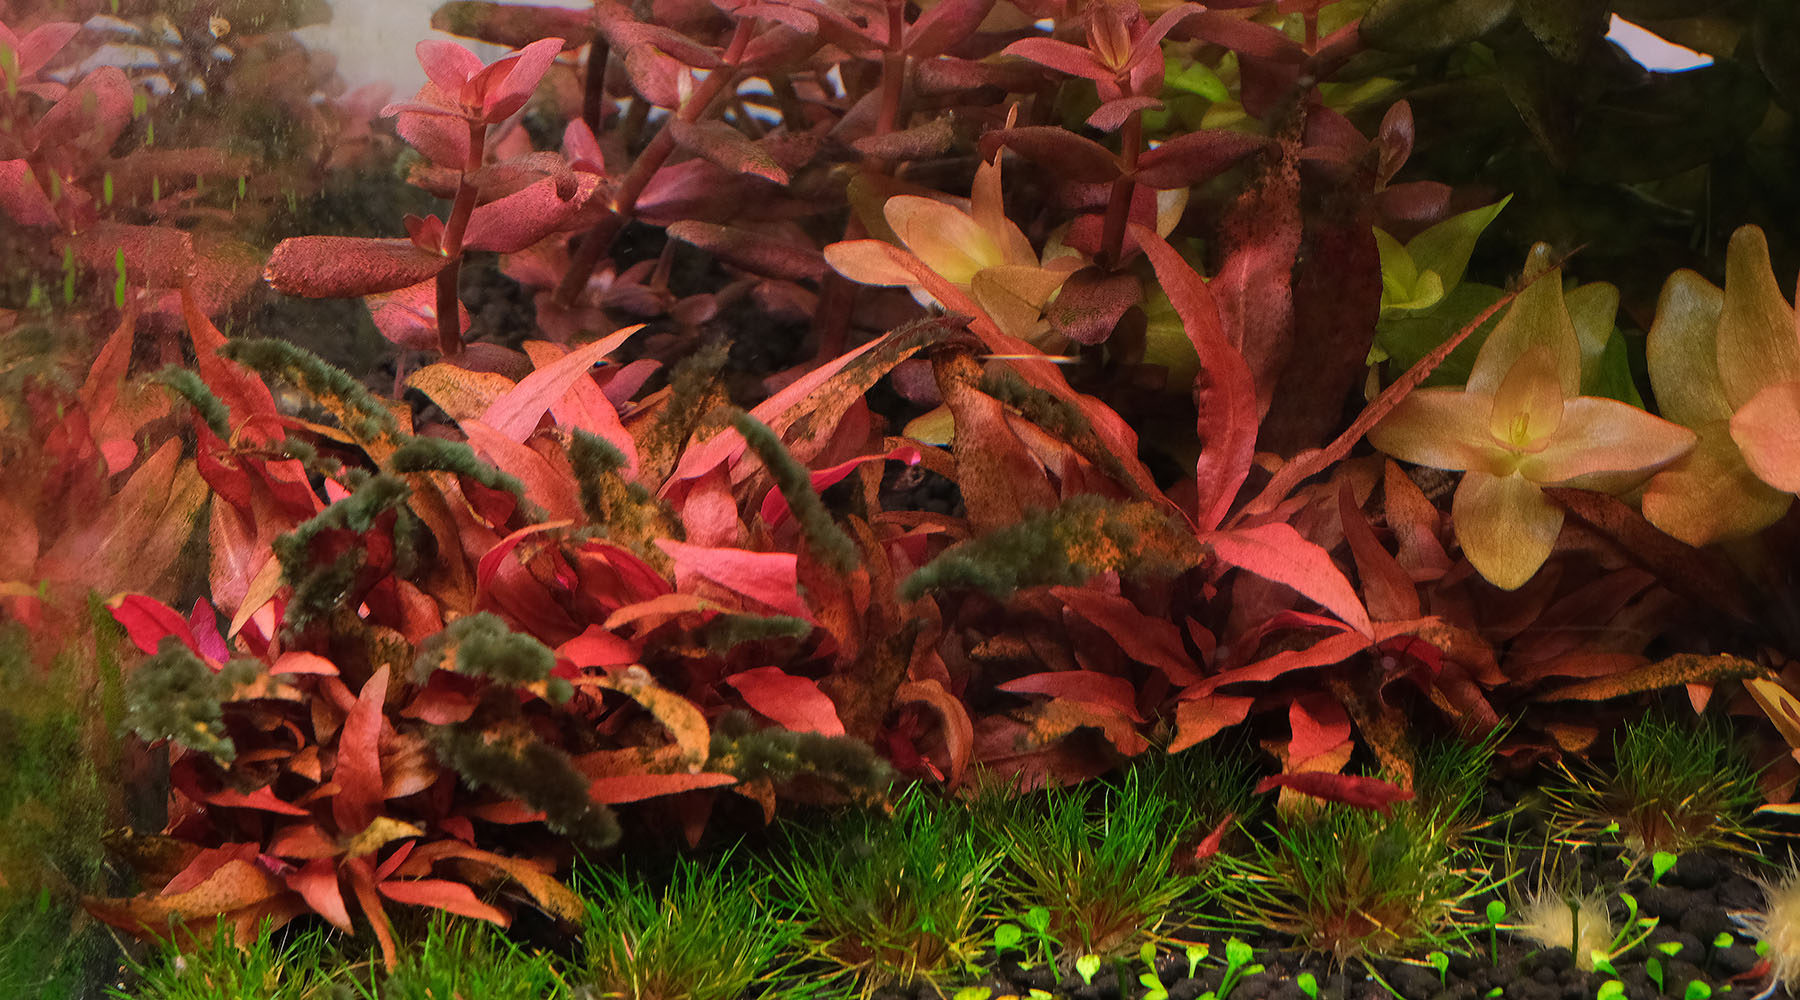
Most mosses can tolerate low CO2 levels and are suitable for tanks without CO2 injection. Here Riccardia/Mini pelia on the right shows a fuller, more compact growth form in a high CO2 environment. It also feels stiffer.
Read this section for detailed plant guides on HC, Monte Carlo, "AR" and more.
Off-gassing / Gaseous Exchange
Off-gassing / gas exchange occurs whenever there is contact time between the water surface and the air. It brings the O2 and CO2 levels in the tank closer to atmospheric concentrations. We need a certain amount of this in our planted tanks. This may seem counterintuitive at first, but it makes it much easier to increase CO2 levels. When your CO2 injection reaches the saturation point - because the tank is a closed system - your injection rate will eventually equal the rate at which the CO2 escapes. If you want to inject at a higher rate - there must be sufficient off-gassing mechanism to prevent a lethal build-up. Ironically, to have a high but non-lethal saturation rate of CO2 in the tank, we need the combination of a good off-gassing mechanism and high CO2 injection rates.
To read in-depth about the physics of why this is so, head to this section.

Achieving good gas exchange isn't that difficult. Firstly, you need a good amount of surface movement and a clean water surface. (surface skimmers, sumps). Secondly, have a good exchange of the top layer of water with the deeper layer in the tanks. (This usually means having your filter outlet or pump close to the water surface).
Water Flow
Apart from getting the CO2 levels right, getting the CO2 evenly distributed throughout the tank is the next biggest influence in a CO2 planted tank.
If a standard CO2 diffuser is used, it should be placed in the downdraft on the wall opposite the filter outlet. (red D below). The CO2 mist should be carried down by the flow until it hits the yellow X in the picture.
If this is not achieved, it means that either the filter flow rate is too low for the tank size, or the CO2 diffuser is not producing a fine enough mist (again, this is common with cheap/poorly made CO2 diffusers).

In the tank above, the lily tube performs two functions well - firstly, it creates water exchange between the surface layer and deeper layers in the tank (off-gassing mechanism). Secondly, it pushes the CO2 mist down towards the plants where it can be utilised.
Conclusions
CO2 saturation rates are a significant factor in tank outcomes, particularly so for folks growing the more difficult species. For aquarist growing just easy plants where CO2 precision is not important, a drop checker may be useful as an indicator that some minimal level of CO2 saturation has been acheived.
For folks targeting a higher level of CO2 saturation, the 1 pH drop method or using a CO2 test kit are better methods than relying on drop checkers.
Which ever method is chosen, the best defense against overly excessive CO2 levels is good gaseous exchange; aquarists should aim for a clean water surface, and a flow pattern that exchanges surface layer water with water layers deeper in the tank.
With regards to livestock tolerance to CO2 saturation levels, it varies from species to species. Many species that come from less well oxygenated water bodies have quite high tolerance for CO2 levels - the cardinal tetras I have have normal feeding and behaviors even at 70ppm of CO2 (see below). Other species that are well known to be CO2 sensitive are Discus, that do not like CO2 saturation rates above 40ppm.
CO2 tuning should be done gradually, while watching livestock for adverse reactions. Having good gaseous exchange and good oxygen levels allow quite a bit of leeway in CO2 injection.

CO2 saturation rates are an important factor in aquarium results, especially for people growing the more difficult species. For aquarists growing only simple plants where CO2 precision is not important, a drop checker can be useful as an indicator that a minimum level of CO2 saturation has been achieved.
For those aiming for a higher level of CO2 saturation, the 1 pH drop method or using a CO2 test kit are better methods than relying on drop checkers.
Whichever method is chosen, the best defence against excessive CO2 levels is good gas exchange; aquarists should aim for a clean water surface and a flow pattern that exchanges surface water with water layers deeper in the tank.
The tolerance of animals to CO2 saturation levels varies from species to species. Many species that come from less oxygenated waters have a fairly high tolerance to CO2 levels - the cardinal tetras I have have normal feeding and behaviour even at 70ppm CO2 (see below). Other species known to be sensitive to CO2 are discus, which do not like CO2 saturation rates above 40ppm.
CO2 adjustments should be made gradually, with animals monitored for adverse reactions. Good gas exchange and good oxygen levels allow some leeway in CO2 injection.
Click here about water parameters, pH and KH.
Click here on more about off-gassing and pushing the limits of CO2 injection.


Share:
Why inject CO2 for a planted tank, isn't it unnatural ?